Hard water leaves calcium and magnesium mineral deposits inside your electric shaver every time you rinse it under tap water. Over weeks, this limescale builds up on the foil mesh and blade edges, increasing friction, dulling the blades faster, and creating conditions where bacteria thrive. A monthly deep clean with diluted vinegar — plus a switch to distilled water for rinsing — fixes the problem and keeps your shaver performing like new.
If your electric shaver has been pulling hair lately, feeling rough against the skin, or leaving a white residue on the foil — and you've already ruled out dull blades — hard water is probably the cause you haven't checked yet.
Most shaver guides focus on blade wear and lubrication. Almost none mention the water you're using to rinse. But in areas with hard tap water, mineral buildup inside the shaver head is one of the most consistent and easily fixable reasons for degraded performance.
This guide covers what hard water actually does to your shaver's cutting mechanism, how to diagnose the signs, a step-by-step cleaning protocol that removes mineral deposits completely, and the maintenance habits that prevent buildup from coming back.
Table of Contents
- What Hard Water Does to Your Electric Shaver
- Signs Hard Water Is Affecting Your Electric Razor
- What Builds Up Inside a Shaver Head
- How to Clean an Electric Shaver Affected by Hard Water
- How Often Should You Clean Your Electric Razor?
- Tap Water vs. Distilled Water for Rinsing
- 3 Maintenance Habits That Extend Razor Life
- Hard Water and Skin Irritation: Is There a Connection?
- Frequently Asked Questions
What Hard Water Does to Your Electric Shaver
Hard water contains elevated concentrations of dissolved calcium and magnesium — minerals that are harmless to drink but problematic for metal surfaces that get wet repeatedly.
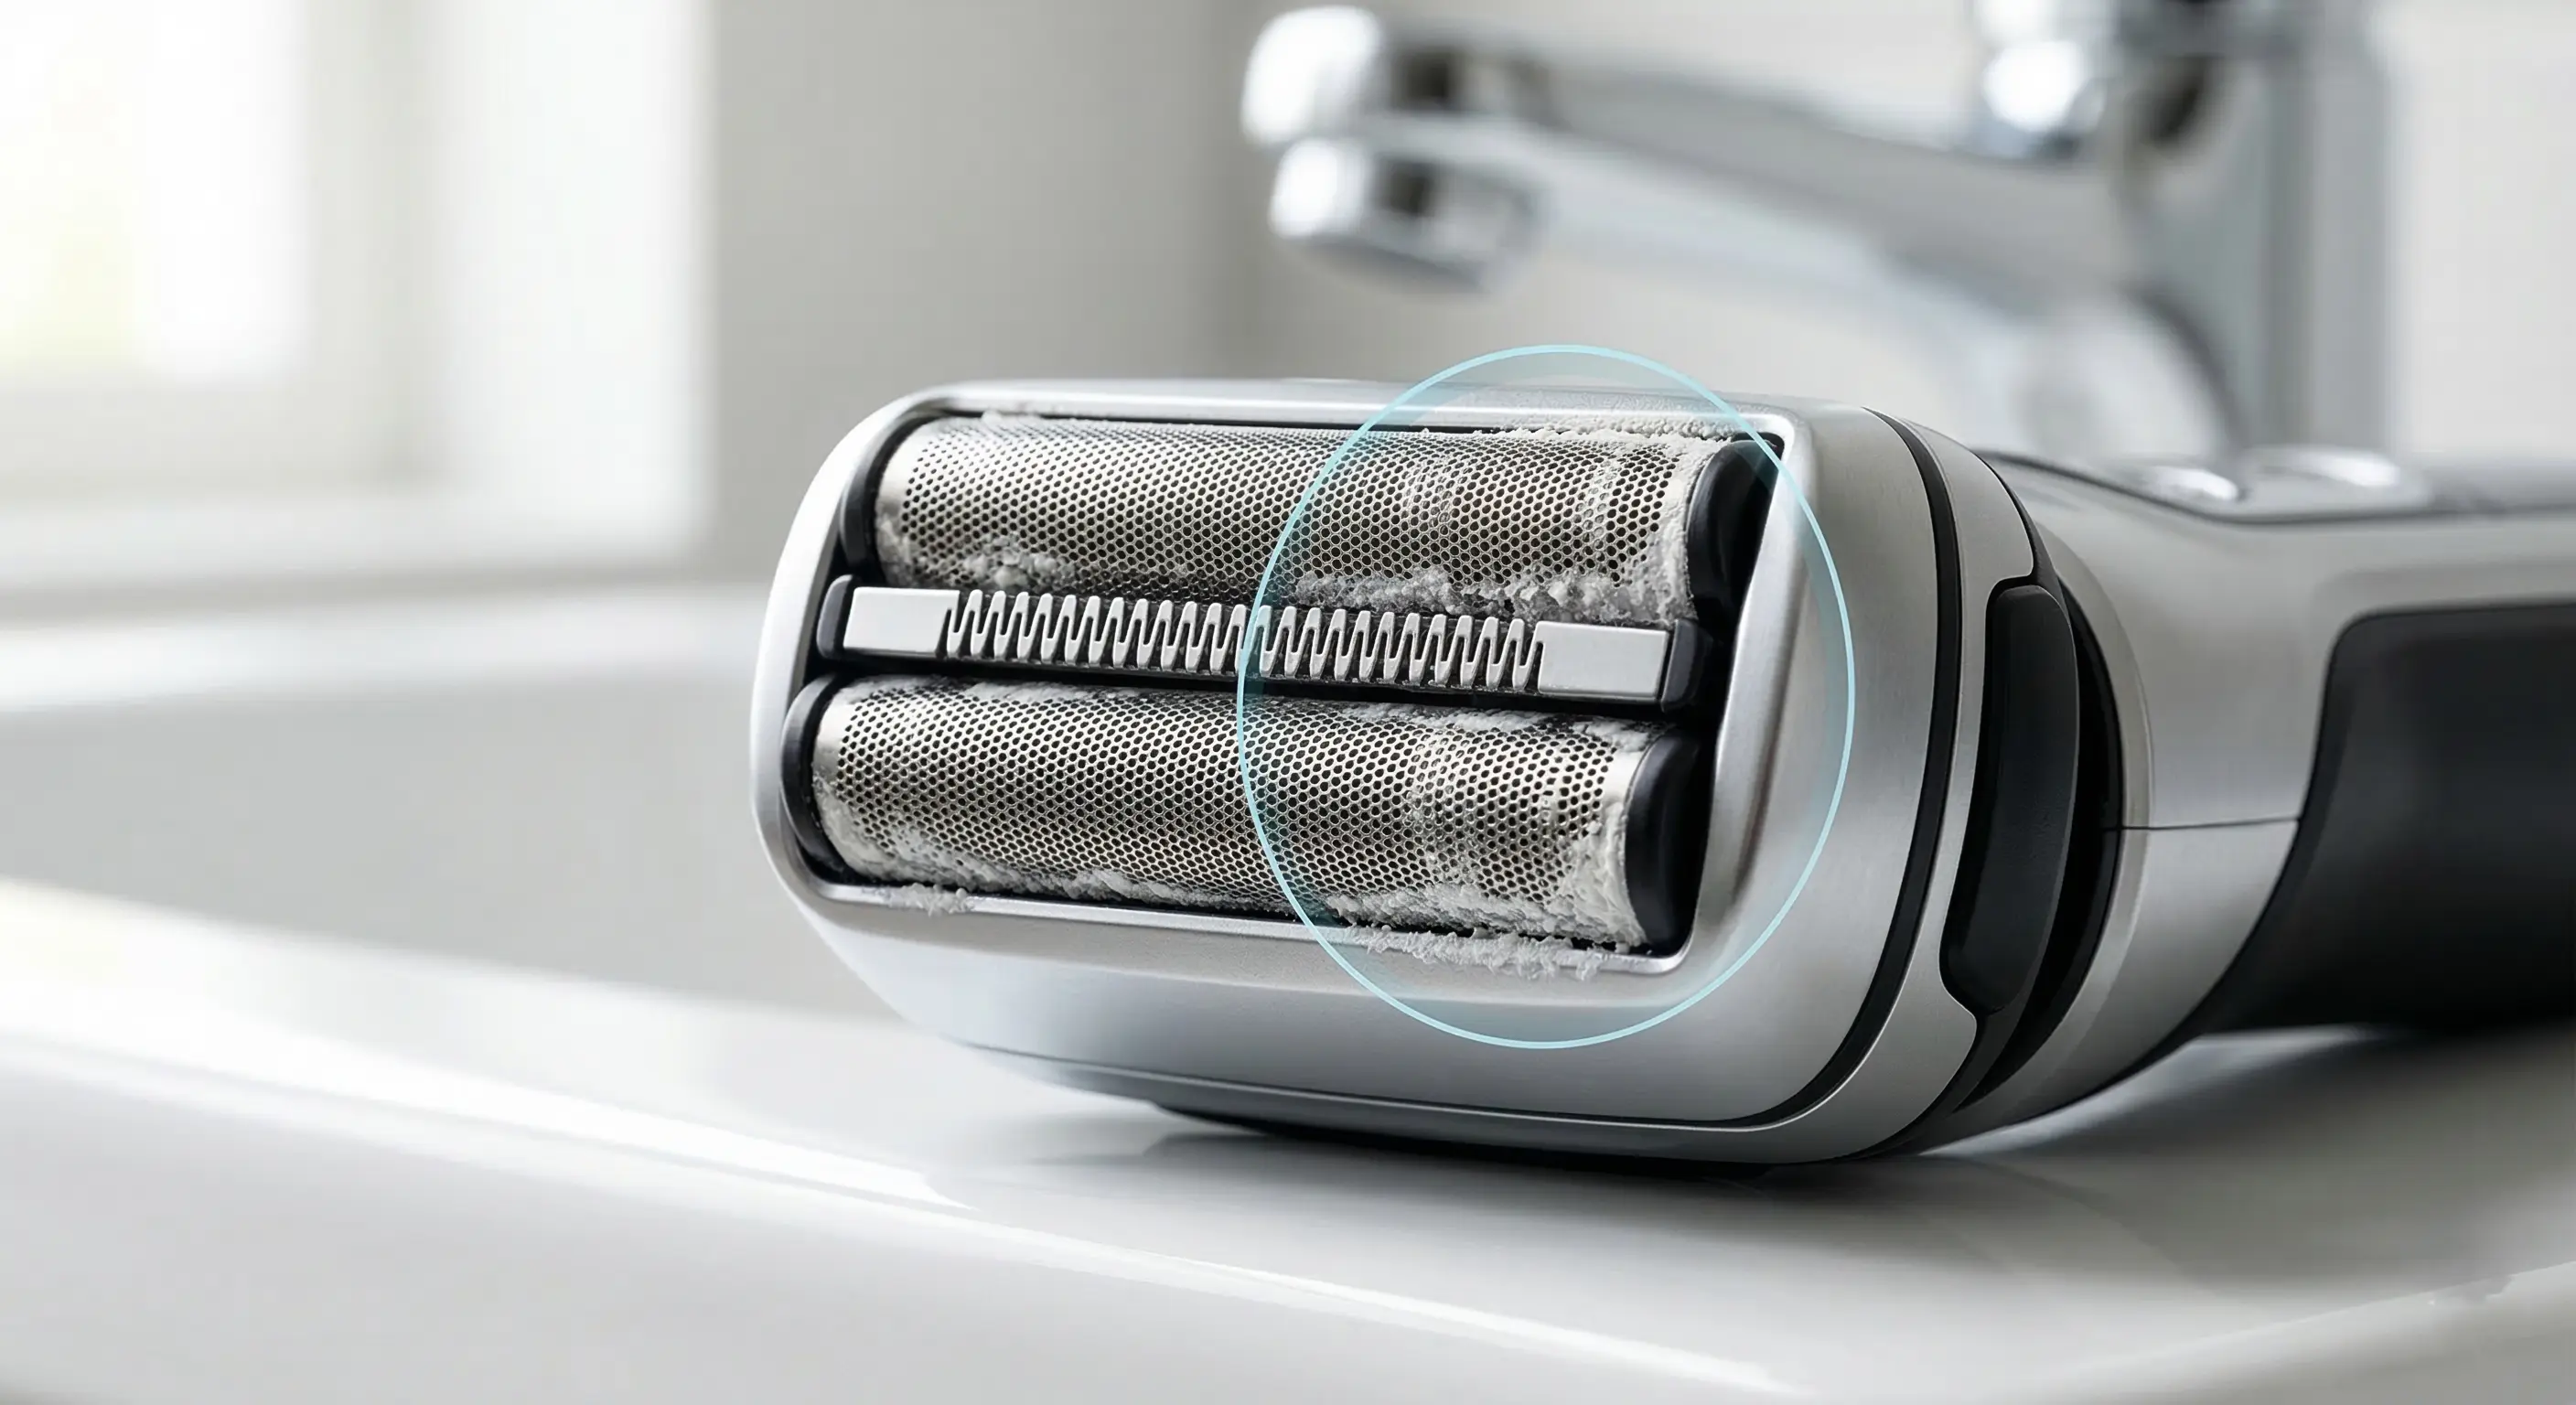
Every time you rinse your shaver under tap water, a thin film of mineral-rich water coats the foil, blades, and internal components. As that water evaporates, the minerals stay behind. The first time, this is invisible. After twenty shaves, you have a measurable layer of limescale inside the cutting head.
That layer does three things, all of them bad for shaving performance. First, it increases friction between the foil and the blade block — the blade has to work harder to oscillate, which drops motor efficiency and creates drag. Second, it coats the edges of the cutting blades, effectively dulling them without any mechanical wear. Third, it creates a textured surface inside the head where bacteria and organic material (skin cells, oil, hair fragments) accumulate faster and are harder to rinse out.
The result is a shaver that feels rougher, pulls more, irritates the skin more, and develops an unpleasant smell faster than normal. People usually blame dull blades and buy a replacement head — which helps temporarily — but within weeks the buildup returns and the problem starts over.
Signs Hard Water Is Affecting Your Electric Razor
These symptoms appear gradually, which is why most people don't connect them to water quality. If several of these apply at the same time, mineral buildup is almost certainly involved:
| Symptom | What It Means | How Quickly It Appears |
|---|---|---|
| White or grey residue on the foil | Calcium/magnesium mineral deposits | 2–4 weeks in hard water areas |
| Razor pulling hair or snagging | Blade edges coated with limescale — reduced cutting efficiency | 4–8 weeks of regular tap water rinsing |
| Foil feels rough to the touch | Mineral crust forming on the mesh surface | 3–6 weeks |
| More skin irritation than before | Bacteria trapped in mineral deposits; increased friction | Varies — starts gradual |
| Unpleasant smell after washing | Organic material caught in mineral texture; bacterial growth | 4–6 weeks without deep cleaning |
| Blades dulling faster than expected | Mineral abrasion wearing blade edges faster than normal use | Ongoing — accelerates over time |
What Builds Up Inside a Shaver Head
Mineral deposits from hard water don't act alone. Inside a shaver head, they combine with several other materials to form a residue that's harder to rinse out than water alone would be:
- Hard tap water — calcium and magnesium ions that crystallize into limescale as water evaporates
- Soap or gel residue — if you shave wet, surfactant residue from shaving cream bonds with minerals and forms a harder compound
- Skin oils and sebum — natural oils from the face coat the foil and trap mineral particles against the surface
- Dead skin cells — microscopic fragments that cling to mineral deposits and create a biofilm layer
- Hair fragments — short cut hairs that pack into the foil slots and hold moisture against the metal
This combination hardens progressively with each shave. A quick rinse under tap water doesn't dissolve it — it adds another mineral layer while washing away the loose debris on top. This is why the problem gets worse with consistent 'clean' maintenance and only improves with a proper descaling process.
How to Clean an Electric Shaver Affected by Hard Water
This process removes mineral deposits completely. Do it once now if you suspect buildup, then once a month as maintenance.
What you'll need: white vinegar (standard 5% acidity), a small bowl, a soft brush (the one that came with your shaver works), shaver lubricating oil, and clean water for rinsing.
1 Disassemble the Shaving Head
Remove the foil frame and blade block from the shaver body. Most modern shavers have a quick-release button — check your manual if you're unsure. Separate the foil, the blade cassette, and any other removable components. Do not use this process on parts that aren't rated for water exposure; check your model's waterproof rating first.
2 Brush Away Hair and Debris
Use the small cleaning brush to remove visible hair fragments from the foil mesh and the blade block. Tap the foil gently against a hard surface (not sharp-edged) to dislodge packed hair from the slots. This step is important before soaking — wet hair fragments are harder to remove and can block the vinegar from reaching the mineral deposits underneath.
3 Soak Metal Parts in Diluted Vinegar
Mix one part white vinegar with three parts water in a small bowl. Submerge the foil and blade block and let them soak for 15 to 20 minutes. The acetic acid in vinegar dissolves calcium and magnesium deposits effectively — this is the same chemistry used in kettle descalers and coffee machine cleaners.
For stubborn buildup that's been accumulating for months, extend the soak to 30 minutes or use a slightly stronger mix (one part vinegar to two parts water). Don't soak plastic components in undiluted vinegar — it can cause discoloration over time.

4 Rinse Thoroughly with Clean Water
After soaking, rinse all components under clean running water for at least 30 seconds each. If you have access to distilled or filtered water, use that for the final rinse — it prevents immediate redeposition of minerals. Run your finger across the foil surface; it should feel smooth rather than gritty. If you still feel texture, a second shorter soak usually clears it.
Shake out excess water and let components air dry completely before reassembling. Assembling while still wet traps moisture that promotes the next buildup cycle.
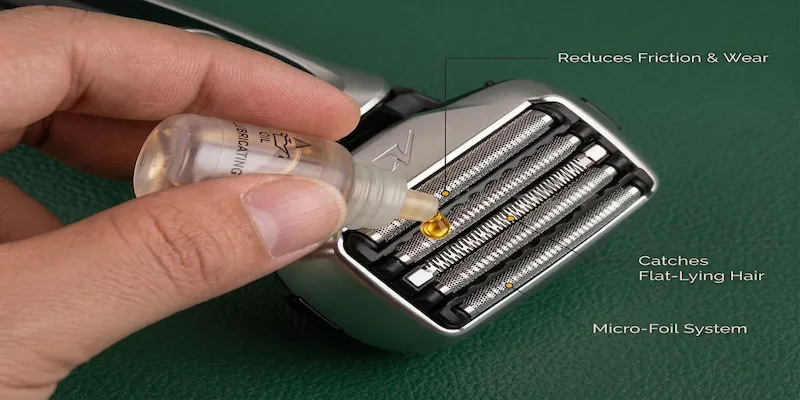
5 Lubricate Before Reassembling
Once dry, apply one small drop of shaver lubricating oil to the foil surface and run the motor for 5–10 seconds with the head assembled. The vibration distributes the oil across the cutting surfaces. This restores the smooth, low-friction movement that mineral buildup had been preventing — and you'll usually notice the difference in the very next shave.
Lubrication also forms a slight protective barrier on the foil surface that slows the rate at which new mineral deposits adhere. It's not a substitute for monthly cleaning, but it extends the interval between deep cleans.
How Often Should You Clean Your Electric Razor?
The right frequency depends on how hard your local water is and how often you shave. Here's a practical schedule that works for most people:
| Cleaning Type | Frequency | What It Does |
|---|---|---|
| Quick rinse | After every shave | Removes loose hair and surface debris |
| Brush clean | Every 3–4 shaves | Clears packed hair from foil slots |
| Alcohol disinfection | Twice weekly | Kills bacteria — especially important for neck-prone breakouts |
| Deep clean (vinegar soak) | Once per month | Removes mineral deposits, limescale, and hardened residue |
| Blade lubrication | Every 10–15 shaves | Reduces friction, extends blade and foil life |
| Full head replacement | Every 12–18 months | Restores cutting performance when blades are genuinely worn |
Tap Water vs. Distilled Water for Rinsing Your Shaver
This is the single habit change that has the biggest long-term impact on shaver performance in hard water households.
| Water Type | Pros | Cons | Best For |
|---|---|---|---|
| Tap water | Free, always available | Deposits minerals with every rinse | Daily quick rinses (unavoidable) |
| Distilled water | Zero mineral content — no deposits | Small cost, requires storing a bottle | Final rinse after deep cleaning |
| Filtered water (pitcher) | Lower mineral content than tap | Some minerals still present | Daily rinsing if distilled isn't practical |
| Bottled still water | Lower minerals than hard tap | Cost adds up over time | Occasional use when traveling to hard water areas |
3 Maintenance Habits That Extend Razor Life
1 Dry the Razor After Every Clean
Water left sitting inside the shaver head — whether tap or distilled — is the starting condition for both mineral buildup and bacterial growth. After every rinse, shake out the excess water, tap the head against your palm to dislodge water from the foil slots, and store the shaver with the head off (or the protective cap off) so air can circulate.
A shaver stored in a sealed travel case while still wet is essentially a mineral deposit incubator. Even distilled water encourages bacterial growth in enclosed spaces.
2 Lubricate on Schedule
Lubricating oil does two things: it reduces blade friction directly (making the shave smoother) and it creates a hydrophobic barrier on the foil surface that slows mineral adhesion. One drop every 10 to 15 shaves is enough — more oil than that just sits on the surface and picks up debris faster.
If you use a cleaning station with a cartridge solution, check the cartridge level regularly. An empty cartridge means weeks of dry running — no lubrication, no protection. Replacement cartridges are worth the cost.
3 Replace Foil and Blade Block on Schedule
Even with perfect maintenance, foil mesh and blade edges have a finite lifespan. Most manufacturers recommend replacement every 12 to 18 months for daily use. In very hard water areas, expect the lower end of that range — mineral abrasion accelerates wear regardless of how well you clean.
The signal to replace isn't just pulling — it's when the shave feels noticeably less close than it used to, even after a fresh deep clean and lubrication. At that point, the blade geometry is compromised and no amount of cleaning will restore performance.
Hard Water and Skin Irritation: Is There a Connection?
Yes, and it works in two directions.
First, mineral deposits inside the shaver increase friction during each stroke. That friction creates micro-tears in the skin surface that wouldn't appear with a clean, well-maintained shaver. For people with sensitive skin, this friction difference is the line between a comfortable shave and a red, irritated neck.
Second, mineral deposits provide an ideal environment for bacterial colonization. The rough, porous texture of limescale traps bacteria more effectively than smooth metal. When a contaminated foil contacts freshly disrupted follicles, the result is post-shave breakouts — specifically the pus-filled bumps on the neck that most people blame on their shaving technique rather than the shaver's hygiene condition.
There's also a third factor: hard water residue on the skin itself. If you wash your face before shaving with hard tap water, the mineral film it leaves behind can block follicle openings and contribute to clogged pores. For the full picture of how hard water affects both hair and skin, see our complete guide to hard water and hair damage.
Frequently Asked Questions
Not immediately, but progressively. Hard water doesn't corrode or break a shaver in a single use — the damage accumulates over weeks. Calcium and magnesium deposits build up inside the foil and blade mechanism, increasing friction and dulling the cutting edges faster than normal mechanical wear would. A shaver used in hard water without monthly deep cleaning will typically need its blade head replaced every 10–12 months instead of the standard 15–18 months. The good news is that a proper vinegar-based deep clean reverses most of the damage and restores performance.
Not when used correctly. Standard white vinegar at 5% acidity, diluted to one part vinegar and three parts water, is safe for stainless steel foils, blade blocks, and most plastic components for 15–30 minute soaks. What to avoid: soaking plastic parts in undiluted vinegar for extended periods (can cause discoloration), using stronger cleaning vinegars above 10% acidity, and failing to rinse thoroughly afterward (residual acidity is mildly corrosive over time). If your shaver has a specific manufacturer's cleaning recommendation that contradicts vinegar use, follow that instead.
Yes, specifically for the final rinse step. Distilled water contains no dissolved minerals, which means it leaves no deposits behind as it evaporates. Using distilled water as the final rinse after a deep clean is the most effective single change you can make if you live in a hard water area. It doesn't need to be used for every rinse — that's impractical and unnecessary. But a distilled water final rinse after your monthly deep clean significantly extends how long the shaver stays clean and performing well.
White residue on an electric shaver foil is almost always calcium and magnesium mineral deposits left behind when hard tap water evaporates. It's the same white crust you see inside a kettle or on shower fixtures in hard water areas. It's not mold or soap buildup (though those can contribute in small amounts). The residue is easy to remove — a 15-minute soak in diluted white vinegar dissolves it completely. If the white residue returns quickly after cleaning, you're in a high-hardness water area and should consider using distilled water for your final rinse after each clean.
Bad smell after washing is almost always bacterial growth inside the shaver head — specifically bacteria colonizing the mineral deposits and organic material (skin cells, oil) that accumulate between deep cleans. Hard water buildup makes this worse because the rough mineral texture traps more bacteria than a smooth metal surface would. The fix is a proper deep clean with vinegar to remove the deposits, followed by an alcohol spray disinfection of the foil. If the smell returns within a few days, increase your cleaning frequency and make sure you're air-drying the shaver completely after every use.